Django Admin Authentication using SSO through Auth0
• 8 minute read
django, sso, auth0, jwt
Table of contents
This post is the second post of two, where I demonstrate how we can achieve SSO with Django applications for the B2E scenario, focused on The Django admin site through Auth0. You can check the first post about adding custom claims to JWT! By the way, I gave a talk explaining the whole solution, and it's available on YouTube:
Avoid creating credentials everywhere: use SSO
If you are an employee and use other credentials apart from yours to access the company's internal applications, this is a bad approach. Unfortunately, this is so problematic that it can lead to bizarre situations. For example, people may ask other employees to share their credentials because they forgot theirs; they have so many credentials that it's hard to memorize them. Another example is when your company has 10 Django services running separately, and each application has its own database and admin interface so people can configure them. That means 10 possible credentials for each person, or even worse: 1 credential shared among your employees. How about having only one credential 🤔?! Single sign-on (SSO) is one approach to minimize credential management risks.
Using SSO with Django Admin
This is the default login interface:
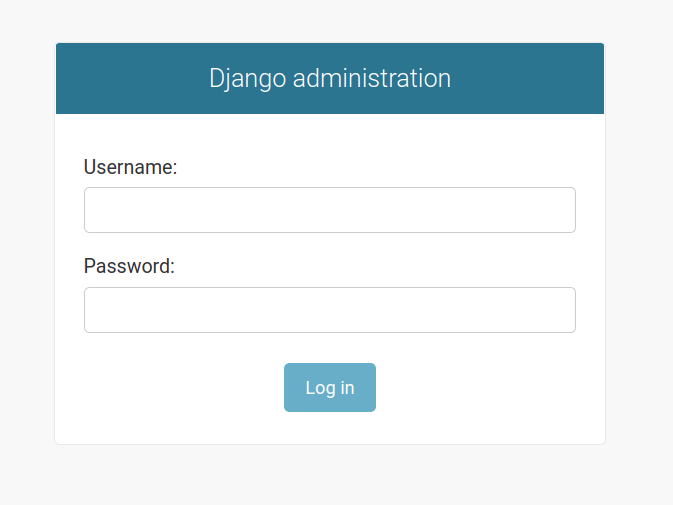
We can change it to something like this:
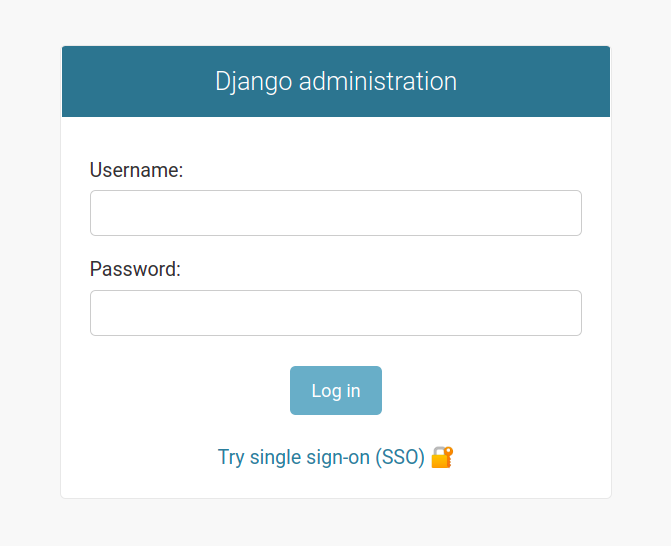
Developers would use username and password if required, whereas all other employees would use the SSO option. Let's understand what we need to do to achieve this.
The Django authentication system
Django has a robust authentication system, and we can use it to enable SSO! When you create a model for your application, Django creates 4 permissions (CRUD operations) for it. For instance, our sample project has 2 models; thus, we have the following permissions:
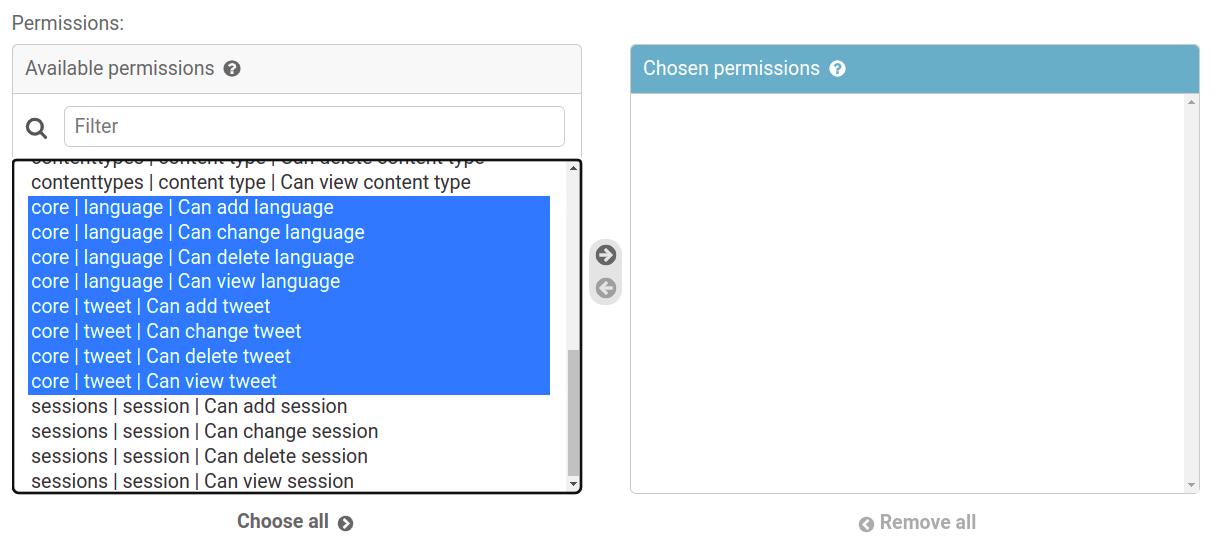
That's how we can use the groups in JWT to bind the incoming user to a set of permissions 💡! To create a set of permissions, you create a group on Django. Let's look at the group viewer:
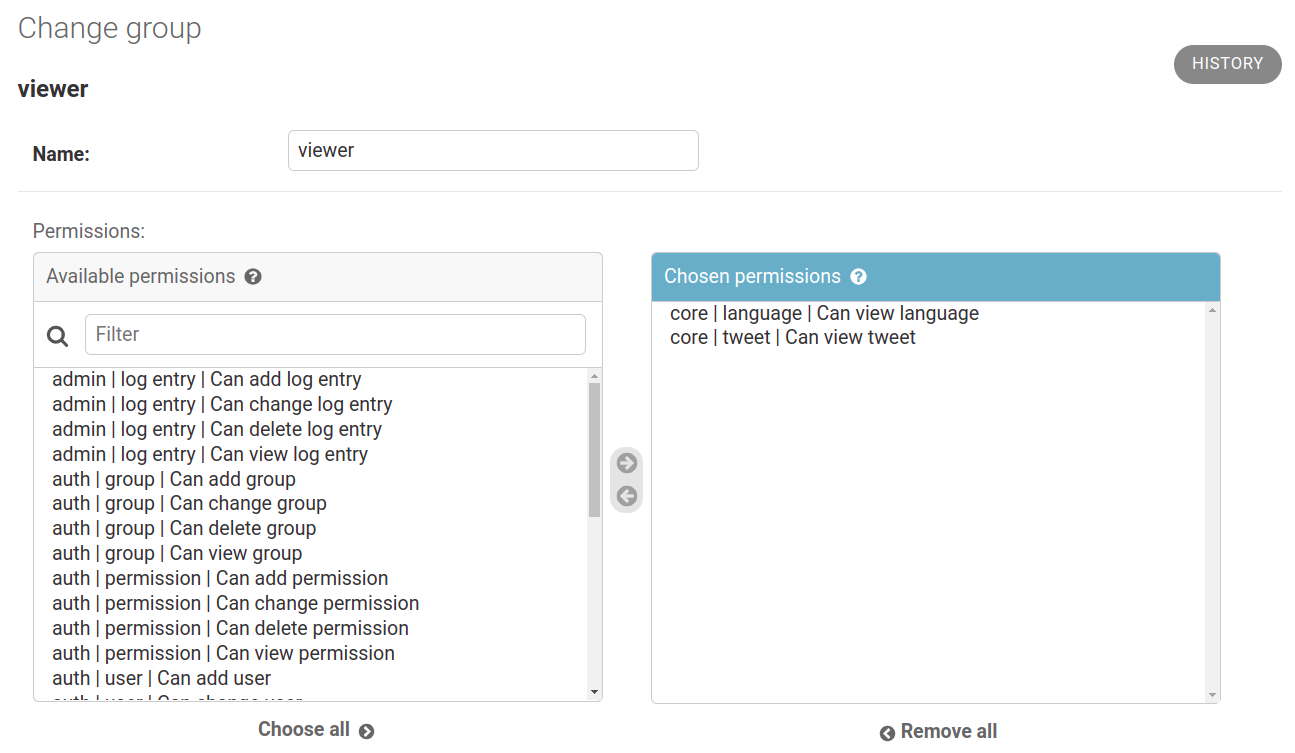
Using an OpenID Connect library
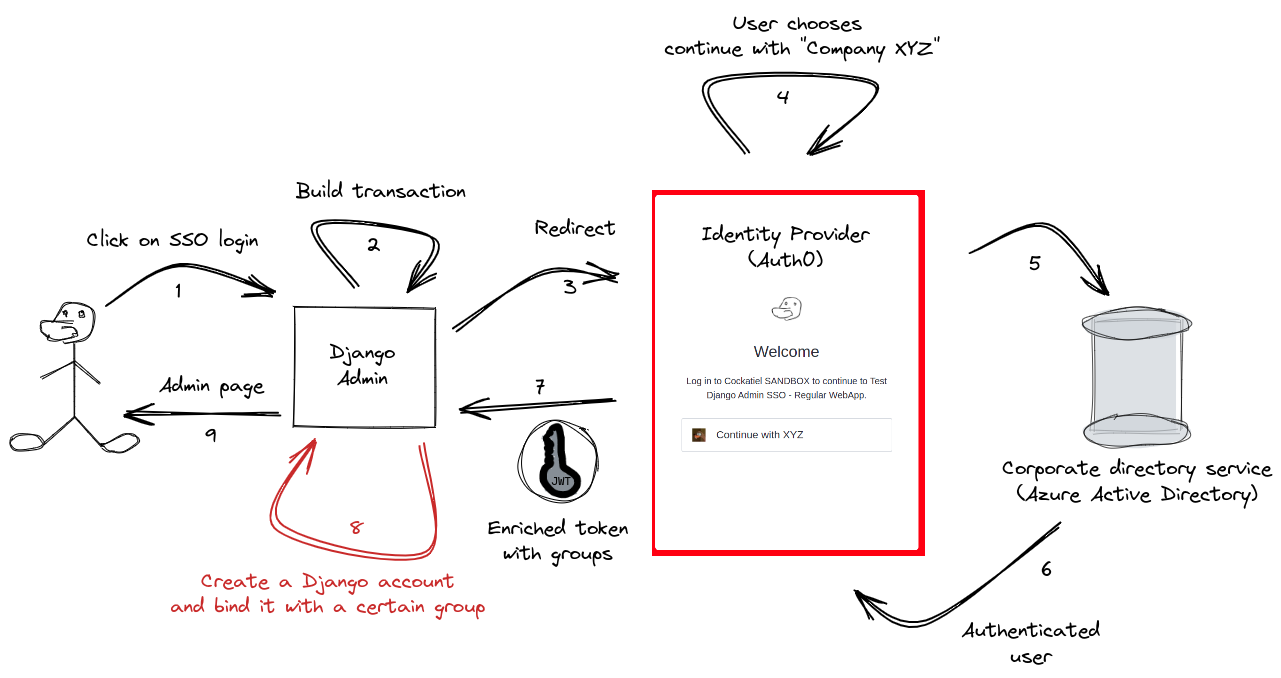
So far, so good: we can use the groups that come with the JWT and create some kind of mapping. If the user is in group XYZ, we map to group viewer on Django, for example. This is the business rule, but how do we handle the Django integration with the Identity Provider? Instead of reinventing the wheel, we can use the awesome mozilla-django-oidc. It will enable smooth integration with the identity provider using the authorization code grant type. The image below illustrates the login flow (I removed some steps from the Authorization Code grant type) and where we'll leave the business rule in step 8:
The library requires some configuration in our Django application, such as:
- Override templates, so we can change the default login interface, including the SSO option.
- Configure custom authentication backend.
- Set basic parameters like
OIDC_RP_CLIENT_ID,OIDC_RP_CLIENT_SECRET, among others. - Implement the provider logout mechanism.
Overriding Django admin interfaces
The process is well explained in its official guide. We can instruct Django to look at the template configuring the DIRS:
SRC_DIR = Path(__file__).resolve().parent

TEMPLATES = [
    {
        "BACKEND": "django.template.backends.django.DjangoTemplates",
        "DIRS": [SRC_DIR.joinpath("templates")],
        "APP_DIRS": True,
        "OPTIONS": {
            "context_processors": [
                "django.template.context_processors.debug",
                "django.template.context_processors.request",
                "django.contrib.auth.context_processors.auth",
                "django.contrib.messages.context_processors.messages",
            ],
        },
    },
]
That's how we should organize the templates:
.
├── django_admin_auth_sso
.   ├── templates
.   .   └── admin
.   .       ├── base.html # Base configuration when the user is authenticated
.   .       └── login.html # Login interface
To enable the user to click on the SSO link on the login interface is one way we can configure login.html:
{% extends "admin/login.html" %}

{% block extrastyle %}
    {{ block.super }}
    <style>
        {# Change Django default CSS behavior #}
        .login #content {
            padding: 20px 20px 0;
            display: flex;
            flex-direction: column;
        }

        .login #content br.clear {
            display: none;
        }

        {# Custom CSS #}
        .alternative-login-section {
            padding-top: 20px;
            text-align: center;
        }
    </style>
{% endblock %}

{% block content %}
    {{ block.super }}

    <section class="alternative-login-section">
        <a href="{% url 'oidc_authentication_init' %}">Try single sign-on (SSO) 🔐</a>
    </section>
{% endblock %}
     └── login.html # Login interface
The URL oidc_authentication_init is injected by the library automatically. In addition, we also have the base.html with the URL oidc_logout, which is also injected:
{% extends "admin/base.html" %}

{% load i18n static %}

{% block userlinks %}
    {% if site_url %}
        <a href="{{ site_url }}">{% translate 'View site' %}</a> /
    {% endif %}
    {% if user.is_active and user.is_staff %}
        {% url 'django-admindocs-docroot' as docsroot %}
        {% if docsroot %}
            <a href="{{ docsroot }}">{% translate 'Documentation' %}</a> /
        {% endif %}
    {% endif %}
    {% if user.has_usable_password %}
        <a href="{% url 'admin:password_change' %}">{% translate 'Change password' %}</a> /
    {% endif %}
    {# Just changed 'admin:logout' to 'oidc_logout' #}
    <a href="{% url 'oidc_logout' %}">{% translate 'Log out' %}</a>
{% endblock %}
Configuring custom authentication backend
We want to enable SSO and the default login authentication mechanism with username and password. So that's how we should configure AUTHENTICATION_BACKENDS then:
AUTHENTICATION_BACKENDS = [
    "django.contrib.auth.backends.ModelBackend",
    "django_admin_auth_sso.support.oidc_helpers.CustomOIDCAuthenticationBackend",
]
The class CustomOIDCAuthenticationBackend is a subclass of OIDCAuthenticationBackend. This is the spot where the magic happens regarding the group mapping. I won't explain it in detail. I strongly recommend running all the tests and debugging them to fully understand what is happening. However, let's summarize the overridden methods:
verify_claims: Verify the provided claims to decide if authentication should be allowed.create_user: Create a new user on Django.update_user: Update the existing user with refreshed attributes from the identity provider.filter_users_by_claims: Return all users matching the claimemail; Otherwise, use the claimsuband try again.
Adding required parameters in settings.py and urls.py
We must provide at least three parameters:
- Identity provider domain.
- Application Client ID.
- Application Client secret.
Using the identity provider domain, we can configure the other required attributes (see more details in the library's documentation) in settings.py. So, that's how we can set it:
CUSTOM_OIDC_GROUPS_CLAIM = os.environ.get("CUSTOM_OIDC_GROUPS_CLAIM", "groups")
BASE_URL = os.getenv("BASE_URL", "http://app.local:8000")
AUTH0_DOMAIN = getenv_or_raise_exception("AUTH0_DOMAIN")
AUTH0_LOGOUT_ENDPOINT = f"https://{AUTH0_DOMAIN}/v2/logout"
OIDC_RP_CLIENT_ID = getenv_or_raise_exception("AUTH0_APP_CLIENT_ID")
OIDC_RP_CLIENT_SECRET = getenv_or_raise_exception("AUTH0_APP_CLIENT_SECRET")

ALLOW_LOGOUT_GET_METHOD = True
LOGIN_REDIRECT_URL = f"{BASE_URL}/admin/"
LOGOUT_REDIRECT_URL = f"{BASE_URL}/admin/logout/"
OIDC_OP_JWKS_ENDPOINT = f"https://{AUTH0_DOMAIN}/.well-known/jwks.json"
OIDC_RP_SIGN_ALGO = "RS256"
OIDC_OP_LOGOUT_URL_METHOD = "django_admin_auth_sso.support.oidc_helpers.provider_logout"
# So we can configure it dynamically
try:
    document = requests.get(f"https://{AUTH0_DOMAIN}/.well-known/openid-configuration").json()
    OIDC_OP_AUTHORIZATION_ENDPOINT = document["authorization_endpoint"]
    OIDC_OP_TOKEN_ENDPOINT = document["token_endpoint"]
    OIDC_OP_USER_ENDPOINT = document["userinfo_endpoint"]
except requests.exceptions.ConnectionError:
    print("Skipping configuration for OIDC! It won't work correctly")
    OIDC_OP_AUTHORIZATION_ENDPOINT = None
    OIDC_OP_TOKEN_ENDPOINT = None
    OIDC_OP_USER_ENDPOINT = None
OIDC_RP_SCOPES = os.environ.get("OIDC_RP_SCOPES", "openid profile email")
OIDC_VERIFY_SSL = True
The OIDC_OP_LOGOUT_URL_METHOD enables an interesting feature. You can provide a function to log out the user on the identity provider side, including the Django admin. For example, that's the code of the provider_logout function to logout on Auth0:
def provider_logout(request):
    params = {
        "returnTo": settings.LOGOUT_REDIRECT_URL,
        "client_id": settings.OIDC_RP_CLIENT_ID,
    }
    return build_url_with_query_strings(settings.AUTH0_LOGOUT_ENDPOINT, params)
Then we have the settings for urls.py, which is vital for the contract with the identity provider to work correctly (like having the callback endpoint):
urlpatterns = [
    path("admin/", admin.site.urls),
    path("oidc/", include("mozilla_django_oidc.urls")),
]
Sample scenario
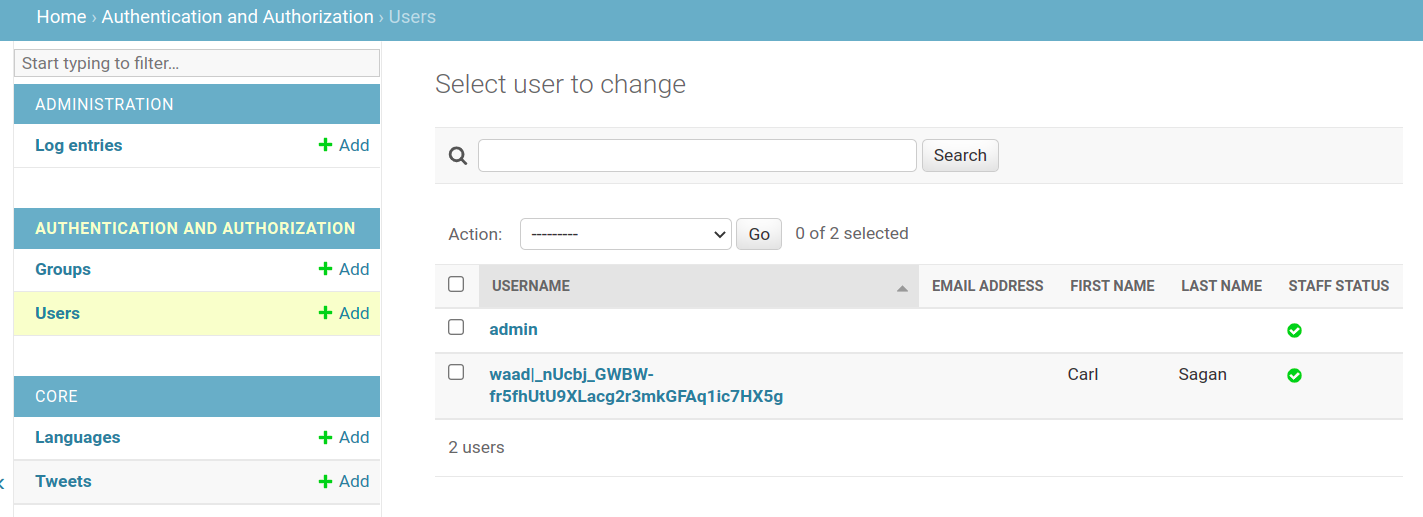
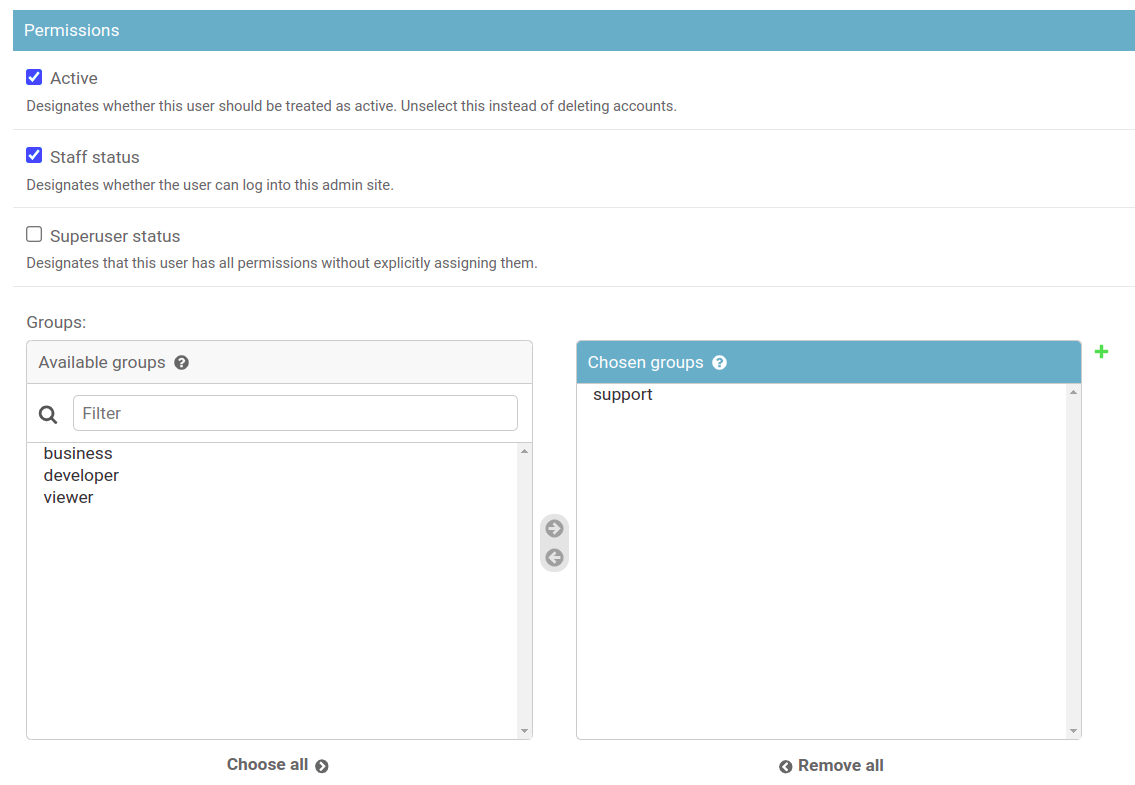
Suppose the user is in the group B2E_APP_MANAGEMENT_SUPPORT in the company's directory service. Then, according to our business rules, he should be configured with group support on Django, but only if he authenticates in our application. If he does, we should see a new entry in the user list:
Then he would have the following permission:
Conclusion
Ensuring proper credentials management is tricky and can sooner or later become a severe headache if your company is spreading credentials everywhere. Using Auht0 with a dedicated tenant for B2E can be one step toward a securer environment.
See everything we did here on GitHub.
Posted listening to Tender Surrender, Steve Vai 🎶.